Issue
By default Recent Documents do not appear in the Windows 7 start menu - instead if recent documents have been saved in word and Word happens to be on the start menu you can expand the start menu to show recent documents opened in Word - however this is not always what users want
Resolution
Add "Recent Items" to the start menu
Right Click on Start
Click Properties
In the Start Menu Tab - Click the Customize button
Find Recent Items - just under the picture options
Ticking this will show the recent items menu on the start menu
With Office 2010 (and possibly 2007 - I never installed that via GPO) Microsoft has made it more difficult to install Office via GPO. With Office 2003 we could just add the MSI as an installation package in a Computer/User GPO.
The task is now accomplished with a computer startup script or user logon script (still configured via Group Policy). I was forced to opt for a computer startup script since logon scripts run as the user and our users do not have rights to install applications on their machines.
Prerequisites:
Office 2013 Installation media/ISO
A convenient network location to store the setup files (preferably a DFS share if installing on multiple sites)
An AD Group or OU to assign the 2013 Installation GPO to
RANT: Why can I not simply upgrade to Office 2013 x64 from a previous Office that is x86? Attempting to do so brings up this error:
Really? Why not just remove them as part of the installer?
So the script will need to detect and remove any existing x86 versions of Office just so that we can install the x64 version. Following Microsofts instructions at http://technet.microsoft.com/en-us/library/ff602181.aspx will work fine if you do not mix environments and are upgrading an x86 version of Office 2003 to x86 Office2013. If you are moving from x86 to x64 (which you should be) then the silent installer will just hang at the point it finds x86 versions running on the machine.
How to install Office 2013 via GPO Guide:
Copy your install files to a share e.g. \\MyFileServer\Office2013
You can create an installation answer file (.msp) and save it into the "Updates" folder to fully customise the installation of Office 2013
Type \\MyFileServer\Office2013\setup.exe /admin
This will bring up the Office 2013 installation config tool. There are loads of settings to pre-configure in here
Edit the config.xml file in the Standard.WW/ProPlus.WW/whatever.WW folder (items marked in RED are things to change/ensure they match your setup):
Download: Office 2013 Install Script (InstallOffice2013.zip)
Open the script and replace the \\MyFileServer\Office2013 UNC paths with your own server name and share name.
What the script does
Detects if the is a x86 or x64bit system, if its an x86 system then exits (though this could be configured to run an x86 Office 2013 installer here if needed).
Removes the Office 2007 compatibility pack
Removes Office 2010 x86 version
Removes Office 2003 x86 version
Reboots the PC if required
Installs Office 2013
Install via startup or logon script
You can either run the cmd file above in your normal logon script (assuming users have admin rights to their machines) or you can deploy via a computer startup script in Group Policy
Does your user share directory look something like this:
I need to copy some files into Bob's documents folder. err
This is not particularly useful and this happens when Windows 7/Windows 8 home drives are viewed from Server 2008 R2 (and I assume possible Server 2012).
The official Microsoft answer is to either remove access rights to administrators to the desktop.inf file saved in the root of each users directory. This would either need to be done manually or on a scheduled script and is quite frankly a rubbish solution.
The *best* way to resolve is to have the Documents folder redirect under a username folder e.g. \\SERVER\share\%username%\Documents so at least your user directory will display the easily identifiable usernames. However if you have a lot of users that might take some doing.
Quick Fix
A simple work around so you can identify the "real" folder names correctly is to add the file name column to explorer
To do this Right click on any of the column headings and select More
Next scroll down until you find filename NOT folder name. This will add the filename column which will show the real name of the folder instead of the "friendly" name of My Documents. It will appear at the far right and to be useful I recommend moving over to the left
Once that is done... Whoop we have a usable, sortable folder list in our usershare!
No need to hunt around for the correct folder any more!
Instuctions
I think this is a great deal for a new MS OS. Windows has typlically always been expensive and the new low price point for Windows 8 is really going to help MS shift units assuming the controversy surrounding the new metro user interface does not get in the way. Which it probably will because it really is not great for a desktop/laptop non-touch devices.
All you need is a Windows 7 PC, that you have bought in the last few months... But actually MS don't ask for any confirmation of purchase etc so really... Any Windows 7 PC/Laptop will be fine :)
Clicking Continue on the above page will take you to the application page:
These are the Windows 7 purchase questions - you could just make it all up, that is the last you will be asked about your existing Windows 7 - Kinda get the impression that MS really just want you to upgrade to Windows 8!
Once you have filled out the required fields and click OK you will be immediately accepted (I assume it might be possible to be denied somehow but I was accepted)
As you can see my retailer for my Windows 7 laptop is a random guy off eBay - that's fine with MS as long as I want Windows 8 :)
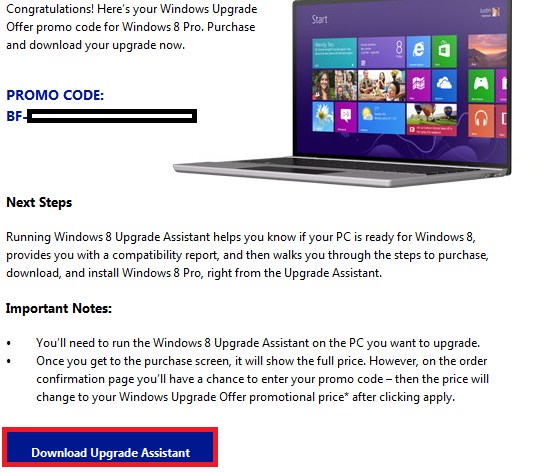
Next you will get an e-mail with your promo code (actially I got 2 e-mails, one to say that I was going to get an e-mail with a promo code and another immediately after with the promo code thanks for the spam Microsoft).
Your promo code e-mail will look something like this:
You need to Download the Upgrade Assistant in order to continue
Click though all of the screens of the Upgrade Assistant.
You can even choose to pay for the upgrade with PayPal!
Once complete you will be shown the order confirmation screen:
The Promo code reduces the cost at this point and I went on to Download the CD. It is possible to pay another 12.99 for Microsoft to ship you a CD as well, which I declined.
After this your copy of Windows 8 will start to download
ZZZzzz
Once downloaded you will be prompted to install Windows 8. You can either go ahead or leave it for now and do so at a later date using the Install Windows shortcut on the desktop.
This is a guide on how I think the "Restore Previous Versions" feature can best be utilised. By default this feature is hardly usable in Windows 7 since restore points are only created when fairly major OS upgrade/installations take place. Would you like to be able to restore a file to how it was yesterday? How about this morning - even though your corporate backups only run nightly!?
This method will provide you with the ability to restore a file to a previous version on a laptop/desktop with your documents saved to your hard disk drive as opposed to a network share.
Configuration
Ensure that system restore points are turned on
Click Start
Right click on "Computer"
Select properties
Select "System Protection" from the right hand side bar (highlighted below)
The Computer Properties Window
Click on the configure button on the "System Properties" dialogue box
System Protection Options available in Windows 7
Ensure that either "Restore system settings and previous versions of files" or "Only restore previous versions of files" is selected
Use the "Max Usage" slider to select the maximum amount of space to set aside for the previous versions of your files. It should go without saying, the more space you assign the further back you will be able to retrieve the file from. Once all of the space you have set aside is used up any new backups are saved over old ones.
Now that you have confirmed that system restores are turned on we can schedule a task to save a restore point for your files. I am going to set mine to run at 12 daily + each startup. If you know that your company does nightly backups this will give you an extra "safety net" to restore to if you make a change during the morning - anything further back you can either use your previous versions or contact the IT department to restore your previous files.
Click Start
Using the Windows 7 search bar to find a program (Task Scheduler is also available in Administrative Tools)
Type Task Scheduler in the search box and click on the task scheduler program
The Task Scheduler Window
Once task scheduler is open you will need to drill down to Task Scheduler Library > Microsoft > Windows > SystemRestore
Double click on the task (highlighted at the top of the centre window) to bring up the SR Tasks window
Click on the Triggers Tab
The Edit Trigger Window
Double click on the daily trigger and set the time to start to 12:00:00 (or whenever you would prefer)
Click OK
Now we are going to set the conditions under which the task runs - by default this task is queued until the computer is idle and wont run at all if the computer is on battery power!
Click on the conditions tab and untick "Start the task only if the computer is idle for" and also "Start the task only if the computer is on AC power"
Click OK
Use the Run option on the right hand side to test the process works ok
Now you will get restore points for your files every time you start up your computer and a second point created at 12:00:00. To restore a file to a previous version
Right click on the file
Select Properties
Click on the previous versions tab
Once a few restore points are made it is possible to revert back to them
Highlight one of the previous versions, at the point the Open, Copy and Restore Buttons become available
Open will simply open the document - be sure to save it somewhere if you need to keep it
Copy will prompt you for a new location/name for the file - this way you can keep both your changed and previous version of the document
Restore will simply overwrite the "current" document with the previous backup. I would never use this option as you will not get a chance to see the contents prior to restoring and you could end up with a "dud" file that is no better than the one you just replaced. Instead open the file and then save it or use the copy option.
Once the file is restored you can click ok on the dialogue box to close it
Thats it, this tool can really help if you have a shared computer/files and wont to protect yourself from accidental file alterations.